
How to Connect a Domain to Cloudflare and Get Its Nameservers
Connect a domain to Cloudflare automatically with the Riki Domains integration or by hand with a nameserver change, find your NS pair and set up .at and .to.
Cloudflare is the most common choice for a new domain's DNS. The free plan gives you DNS, an HTTPS certificate and a proxy that hides the server IP, and for .at and .to domains at Riki Domains your own nameservers are required, which in practice usually means Cloudflare. This guide covers three scenarios: connecting new domains automatically, connecting a domain you already own by hand, and ordering .at and .to, where nameservers are needed before the domain is even registered. The Cloudflare interface is described as of November 2026.
The short answer
- New domains connect themselves: add a Cloudflare API key in the bot and enable the integration, and turn on Cloudflare Provisioning in the panel.
- A domain you already have: add it to Cloudflare, copy the assigned nameserver pair and paste it with Change NS on the domain card in the panel.
- .at and .to: after payment the bot waits for your nameservers. Cloudflare will not onboard an unregistered domain, so send the pair it already gave other domains in your account, then check it after registration.
- Copy nameservers exactly: two names of the form
name.ns.cloudflare.com. Generic names such asns1.cloudflare.comdo not work. - After activation: SSL mode Full (strict) or Full, and the proxy (orange cloud) on the site's records.
What Cloudflare gives you
- DNS. Records are edited in one dashboard and update quickly.
- HTTPS without server setup. After activation Cloudflare issues a certificate for the domain on its own.
- A hidden server IP. When a record is proxied (orange cloud), DNS answers with Cloudflare addresses, not your server's.
- Caching and basic protection. Cloudflare serves static files from its network and filters some junk traffic before it reaches the server.
All of this is on the free plan, which is enough for most sites.
Method 1. Automatically: the Riki Domains integration
If you buy domains regularly, set up the integration once and every new domain lands behind Cloudflare right after the purchase.
- In the bot @riki_domains_bot open Dashboard → CloudFlare.
- Use the button to add or change the key and send an API key from your Cloudflare profile (the API Tokens section).
- Use the enable button so that the status switches to enabled.

The bot describes the feature like this: after a purchase it adds the domain to your Cloudflare account and changes the NS records for you. In the web panel the same setting sits in the Cloudflare section as the Cloudflare Provisioning switch.
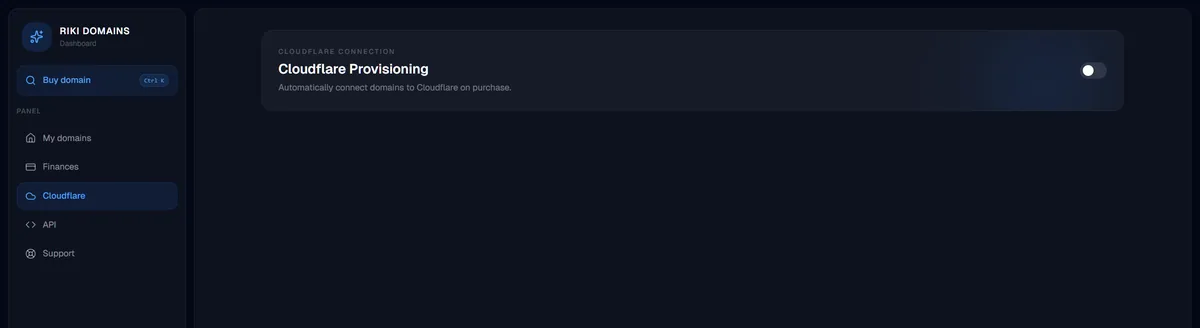
The integration fires at purchase time, so connect domains bought before you enabled it by hand, using method 2.
Method 2. By hand: add the domain to Cloudflare and change nameservers
- Add the domain to Cloudflare. In the Cloudflare dashboard open Domains → Onboard a domain, enter the domain without
www(for exampleexample.com) and choose how to bring in DNS records: a quick scan finds existing ones. Select Continue and pick the Free plan. - Review the records. The scan does not find everything, so check the list by hand: A records for the root and
www, and mail records (MX, SPF, DKIM, DMARC). Turn the proxy on (orange cloud) for the site's records, and leave mail server records unproxied (DNS only). - Copy the nameserver pair. Cloudflare shows the assigned servers at the end of onboarding and later on the domain's Overview page. Copy the names exactly, with nothing extra.
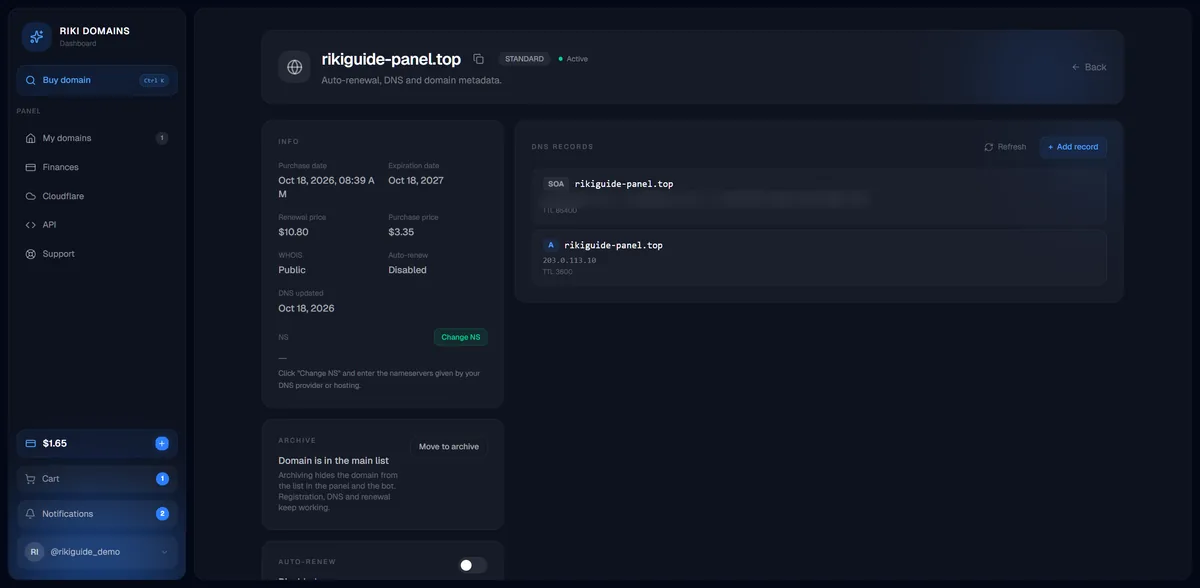
- Change the nameservers at Riki Domains. In the panel open My domains → the domain → Change NS and paste both servers. If you only use the bot, log in to the panel with a code: the
/logincommand in the bot gives a one-time code valid for 10 minutes. - Check DNSSEC. If DNSSEC is on for the domain, Cloudflare advises turning it off before the nameserver change, or the domain may stop resolving. After activation DNSSEC is turned back on, this time in Cloudflare.
- Wait for activation. Cloudflare says up to 24 hours, and the Riki Domains API documentation says up to 48 hours. When the nameservers update, you get an email and the domain status under Domains changes to Active.
.at and .to domains: nameservers are needed at order time
A Riki Domains staff member registers .at and .to domains on the Titan plan manually with the service's details, and the domains run on your own nameservers. After payment the bot waits for the nameservers, and the domain is registered once they arrive.
The catch is that Cloudflare only onboards registered domains, so you cannot get a pair for a new .at domain from Cloudflare in advance. Do it in this order:
- Take the pair from your account. Open any domain in Cloudflare and copy the nameserver pair from its Overview page. Cloudflare tries to assign the same names to every domain in an account, so the new domain will most likely get the same pair.
- Send this pair to the bot right after payment. Do not wait: until the nameservers arrive, the domain is not registered.
- After registration, add the domain to Cloudflare (Onboard a domain) and compare the assigned pair with the one you sent.
- If the pair differs, change the nameservers in the panel with Change NS. For domains registered by hand, a staff member enters the new nameservers at the registrar, so the change does not apply instantly.
Cloudflare does not guarantee the same pair: it may differ if someone added the same domain to another account, or if Cloudflare nameservers were set on the domain before it was onboarded. That is why the check after registration matters. If your Cloudflare account has no domains yet, message support before paying and they will explain the order.
Generic names such as ns1.cloudflare.com will not work: Cloudflare serves a domain only on the two servers it assigned to it. The rules of each zone are on the .at and .to pages.
Register a domain in 2 minutes
1,500+ zones, WHOIS privacy on request, crypto payment and DNS management — all inside the Telegram bot.
What to set up after activation
- SSL/TLS. Use Full (strict) if the server has a valid certificate, or Full for a self-signed one; Cloudflare recommends these modes. Flexible only encrypts the leg between the visitor and Cloudflare, and if the server redirects to https itself, the browser shows ERR_TOO_MANY_REDIRECTS.
- Always Use HTTPS. Under SSL/TLS → Edge Certificates this switch redirects every http request to https when the server does not do it itself.
- Proxy. The orange cloud on the site's A and CNAME records hides the server IP. The grey cloud (DNS only) is for mail and for services that need to see the real address.
How to check the connection
nslookup -type=ns example.com 1.1.1.1ordig +short ns example.com @1.1.1.1should return two Cloudflare names.dig +short example.com @1.1.1.1for a proxied record returns Cloudflare addresses, not your server's. That is expected.- In Cloudflare the domain status is Active, and the activation email has arrived.
If the domain does not open, go through the checks in Domain not opening. The general order of setup after a purchase is in What to do after buying a domain.
Common mistakes
- Not reviewing the imported records. The scan misses things: without an A record for
wwwor without MX, the site or mail stops working after the nameserver change. - Entering generic names such as
ns1.cloudflare.cominstead of the assigned pair. - Keeping the old nameservers next to the new ones. Cloudflare's servers must replace the previous ones, not be added to them.
- Changing nameservers with DNSSEC on. Turn it off first and enable it in Cloudflare after activation.
- Choosing Flexible with a server that redirects to https.
- Editing records in the wrong place. After the nameserver change only the records in Cloudflare count.
Checklist
- Decide: the integration for new domains or a manual connection.
- Add the domain to Cloudflare and review the records.
- Copy the assigned nameserver pair.
- Paste the nameservers with Change NS in the panel, or send them to the bot when ordering .at and .to.
- Wait for the Active status and check the nameservers with
nslookupordig. - Choose SSL mode Full (strict) or Full and turn on the proxy for the site's records.
Connecting a domain to Cloudflare takes a few minutes of work and up to a day of waiting. Enable the integration once, and the next domains will land behind Cloudflare on their own, right after the purchase.
FAQ
Where do I get Cloudflare nameservers for my domain?
Cloudflare assigns them when you add the domain: the pair is shown at the end of onboarding and later on the domain's Overview page. They are two names of the form name.ns.cloudflare.com and must be copied exactly.
Why won't Cloudflare let me add an .at domain that is not registered yet?
Cloudflare only onboards registered domains. For .at and .to, send the bot the nameserver pair Cloudflare already gave other domains in your account: it usually gives every domain in an account the same names. After registration, add the domain to Cloudflare and compare the pair it was assigned.
How long does Cloudflare activation take?
Cloudflare says up to 24 hours, and the Riki Domains API documentation allows up to 48 hours for nameservers to update across the network. When it is done, Cloudflare sends an email and the domain status changes to Active.
Can new domains be connected to Cloudflare automatically?
Yes. In the bot open Dashboard → CloudFlare, add your Cloudflare API key and enable the integration; in the panel turn on the Cloudflare Provisioning switch. From then on every newly purchased domain is added to your Cloudflare account and its nameservers are switched for you.
Which SSL mode should I choose in Cloudflare?
Full (strict) if the server has a valid certificate and Full if the certificate is self-signed: these are the modes Cloudflare recommends. Flexible only encrypts the leg to Cloudflare, and with a server that redirects to https itself it causes ERR_TOO_MANY_REDIRECTS.
Register a domain in 2 minutes
1,500+ zones, WHOIS privacy on request, crypto payment and DNS management — all inside the Telegram bot.